Just to add to the good (and bad, and terrible) MSI writing already out there, here are some tiny notes and tips that might be useful or interesting or amusing to somebody, somewhere.
MSI database fields that use the Formatted data type can take expressions of the form [PropertyName], and the value will be expanded at run time. The [expression] doesn’t need to be the whole field; for example, you can put the following in a registry value and the appropriate parts of the oddly phrased sentence will be expanded at run time:
Installed to [INSTALLDIR] by [USERNAME] from account [LogonUser] at [Time] on [Date].
As with all things property-related, capitalization (and spelling) matter.
You can tell the data type of a field by looking at the Windows Installer help library topic for the given table. The topic “Registry Table” indicates that the Name and Value fields use the Formatted data type, which means that property values contained in those fields will be expanded. On the other hand, the Name and Description fields of the Shortcut table use other data types (Filename and Text), and therefore don’t expand properties.
(See the topic “Formatted” for other expressions that will get expanded, such as [%ENV_VAR] for environment variables and [\[] and [\]] for literal square-bracket characters.)
While we’re on the subject, a field that uses the Identifier data type doesn’t need square brackets around it. For example, the DirProperty field of the RemoveFile table accepts a directory property such as AppDataFolder, and does not take brackets.
It has often been remarked that one should avoid using custom actions if a built-in table and action will do. I’ll repeat the remark in the hope that it will help: Don’t use a custom action if a built-in table and action will do.
For example, my heart sinks every time I see someone using VBScript custom actions and the FileSystemObject to manipulate files, when three tables will handle many common cases: the RemoveFile table, the DuplicateFile table, and the MoveFile table. Taking each one in turn:
The RemoveFile table is where you specify files that you want to remove during uninstallation (most common case), installation, or both. (In each of these tables, and in fact most tables related to data transfer, the action is tied to a component. In this case, RemoveFile records are associated with a component, and the file is removed when the associated component is installed or uninstalled.) The removal occurs when the RemoveFiles action runs, which must be before InstallFiles runs.
For example, suppose you know that on first launch, your product will create a file called file_to_remove.ext in the main program directory, represented by the directory property INSTALLDIR. (The main directory property name might be different depending on the development environment or help file you’re using.) Windows Installer will normally err on the side of caution during uninstallation and leave behind any files it didn’t install, but to remove the file at uninstallation time, you can add a record similar to the following to the RemoveFile table.
| Field name | Sample value | Remarks |
| FileKey | RemoveMyFile | arbitrary identifier for this record |
| Component_ | main_exe | pick a component |
| FileName | file_to_remove.ext | can use wildcards; leave blank to remove empty directory; won’t delete subdirectories |
| DirProperty | INSTALLDIR | must be property with no brackets; can’t be raw path |
| InstallMode | 2 | that is, when component “main_exe” is removed |
Having set this up, when you uninstall your product, file_to_remove.ext will be removed instead of being left behind.
For some reason, the RemoveRegistry table removes extra registry information during installation but not uninstallation. To remove extra registry information during uninstallation, look into the hyphen “-” flag for the Registry table.
The DuplicateFile table is where you specify files that you want to copy, assuming you also installed the files with the File table. The following example copies file_to_copy.ext to INSTALLDIR with the new name newname.ext, assuming the main_exe component has been selected to be installed locally.
| Field name | Sample value | Remarks |
| FileKey | DuplicateMyFile | arbitrary identifier |
| Component_ | main_exe | pick one |
| File_ | file_to_copy.ext | identifier from File table |
| DestName | newname.ext | new name if you want one, blank if you don’t |
| DestFolder | INSTALLDIR | property with no brackets |
These files are processed by the DuplicateFiles action, which must occur after InstallFiles.
The MoveFile table is similar to the DuplicateFile table, but the files that you want to move or copy need not have been installed with the File table. The files are moved when the MoveFiles action runs (before InstallFiles), and will not be removed when the product is removed.
Windows Installer caches a product’s MSI database in the hidden directory %WINDIR%\Installer, which is how users can uninstall without having to put the CD back in. (In MSI Automation, Installer.ProductInfo with constant LocalPackage will tell you where the cached package is; ditto MsiGetProductInfo with INSTALLPROPERTY_LOCALPACKAGE.) By default, maintenance operations such as repairs use this cached database, which is why testing is easier if you uninstall an old version before installing a new one: your changes in a new build will ordinarily not be available because they’re not in the cached database.
Trouble arises if you have a custom action that crashes during uninstallation: you can’t just make a new build without the error and run it, since maintenance mode will continue to use the cached MSI database.
(A common beginner mistake is not realizing that the same sequences are used for both installation and uninstallation, and therefore a custom action with no condition will run for installation, repairs, modifications, and uninstallation. Not that you asked, but the condition Not Installed succeeds for a first-time installation, and REMOVE="ALL" will work in the Execute sequence after InstallValidate to detect a complete uninstallation. Mind the capitalization and quotation marks.)
To re-cache the MSI database so a subsequent uninstallation will work, deploy the new build (with the error removed), setting the REINSTALLMODE property to include the letter v, as in:
msiexec /i product.msi REINSTALLMODE=voums REINSTALL=ALL
This is how minor upgrades are deployed, too, of course.
Occasionally you’ll hear suggestions to use the Windows Installer Cleanup Utility or msizap, which is overdoing things, or to find and edit the cached MSI database in the hidden Installer directory, which is just crazy.
Major upgrades in Windows Installer use only the first three fields of the ProductVersion property: the FindRelatedProducts action won’t distinguish version 1.2.3.4 of a product from version 1.2.3.5.
Some take this to mean that file versions in the File table are limited to three fields, which isn’t the case. The Version field of the File table uses the Version data type, described as xxx.xxx.xxx.xxx, where each field is an integer from 0 through 65536.
To demonstrate this, create a file called versions.exe with version 1.0.0.0 and place it in (say) C:\Program Files\Versions, and create another copy with version 1.0.0.1, adding it to an installer that installs it to that same directory. If you create a log file with msiexec /i version_test.msi /L*v everything.log, you can search for “file:” and find this (edited):
MSI (s): Executing op: FileCopy (SourceName=versions.exe, DestName=versions.exe,
         Version=1.0.0.1, ...)
MSI (s): File: C:\Program Files\Versions\versions.exe; Overwrite; Won't patch;
         Existing file is a lower version
Or I guess you could just have checked to see if the new file was installed.
If MSI considered the versions identical, the log message would be (strange capitalization and all):
MSI (s): File: C:\Program Files\Versions\versions.exe; Won't Overwrite; Won't patch;
         Existing file is of an equal version
Shortest private property names (4 letters)
Shortest public property name (5)
Longest public property name (32)
Longest private property name (33)
Properties with triple letters
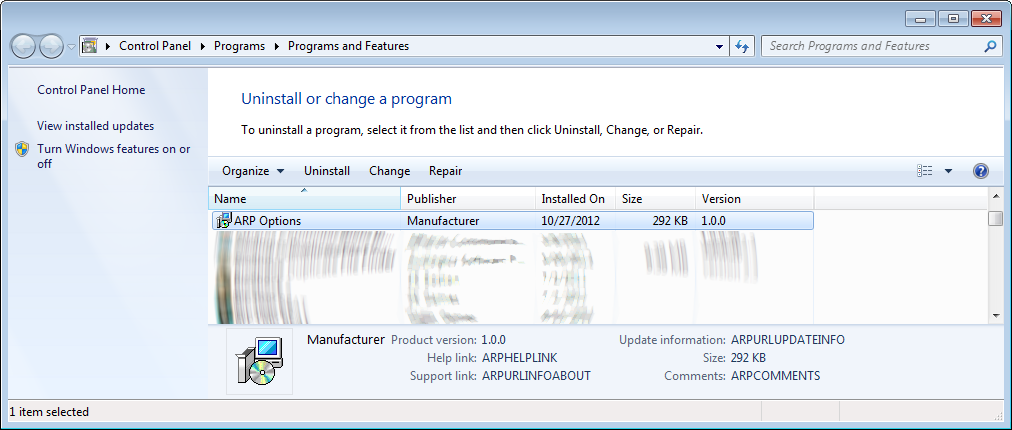
A Windows Installer installation usually creates a product entry in the Add or Remove Programs list—nowadays it’s the Programs and Features list, though nobody seems to call it that—similar to the following:
At the bottom of the figure are the MSI property names that fill in each field. And in the middle, “ARP Options” is the value of ProductName, and “1.0.0” is the value of ProductVersion.
Before Windows Vista, it really was Add or Remove Programs (and before that, Add/Remove Programs):
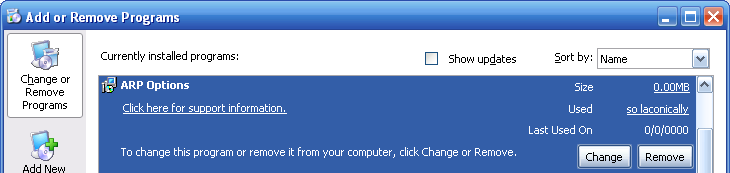
If you want to hide the Uninstall button or the Remove button, set ARPNOREMOVE to 1 in the Property table or from the command line. If you want to hide the Change button, set ARPNOMODIFY to 1. (If you want to annoy users, set both properties to 1.) You can suppress the whole entry by setting ARPSYSTEMCOMPONENT to 1.
Setting ARPSYSTEMCOMPONENT only hides the Add or Remove Programs entry; it doesn’t suppress creation of the information used to uninstall the product. Launching the MSI a second time still runs maintenance mode, and so forth. To suppress creation of the uninstall information, you can remove or “condition out” the actions RegisterProduct, RegisterUser, PublishProduct, and PublishFeatures.
The following figure shows the properties that control display text in the Support Info panel, pre–Windows Vista. (Of course, the Version field uses ProductVersion, and ProductName shows up a couple of times.) The hyperlinked manufacturer name is backed by the URL in the ARPURLINFOABOUT property.
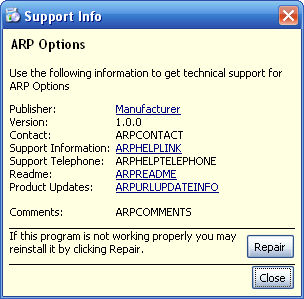
If you leave any of these properties undefined, the corresponding line won’t be displayed. For example, leaving ARPHELPTELEPHONE unset causes the Support Telephone entry to be omitted. Moreover, setting ARPNOREPAIR to 1 hides the “If this program is not working…” paragraph and the Repair button.
Note that these ARPNOMODIFY/REMOVE/REPAIR properties have no effect on the maintenance-type dialog box usually displayed when a user launches an installer a second time or clicks Change in Programs and Features or Add or Remove Programs.
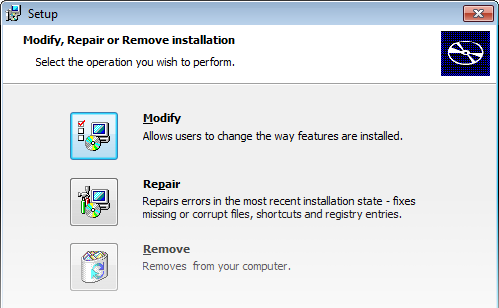
To modify this dialog box, modify the Dialog-Control-RadioButton-whatever tables of your MSI database or use your environment’s dialog editor.
To be overwhelmed by information about what an MSI installer is doing, run the following from a command prompt:
msiexec /i ProductName.msi /L*v everything.log
In particular, the *v following the /L switch specifies to do verbose logging of everything the installer does.
Trouble is—which you know because I telegraphed the punchline—it’s often way more than you wanted. The MSI help topic “Command-Line Options” (or running msiexec /?) lists other, more specific switches that can follow /L. In particular, you can log just the properties like this:
msiexec /i product.msi /Lp properties.log
The output has just entries like this:
=== Logging started: 0/0/0000  00:00:00 ===
Property(S): DiskPrompt = [1]
Property(S): UpgradeCode = {HHHHHHHH-HHHH-HHHH-HHHH-HHHHHHHHHHHH}
Property(S): ProductToBeRegistered = 1
Property(S): SourcedirProduct = {HHHHHHHH-HHHH-HHHH-HHHH-HHHHHHHHHHHH}
    ... many more ...
Property(C): DiskPrompt = [1]
Property(C): UpgradeCode = {HHHHHHHH-HHHH-HHHH-HHHH-HHHHHHHHHHHH}
Property(C): ALLUSERS = 1
Property(C): PrimaryVolumeSpaceRemaining = 0
Property(C): PrimaryVolumeSpaceRequired = 0
    ... etc. ...
=== Logging stopped: 0/0/0000  00:00:00 ===
Pop quiz: why do the client (C) properties appear after the server (S) properties?
And a tip: to see what properties changed or appeared between the (C) and (S) sides, run a command like this:
sort /+13 properties.log
The output looks something like this:
Property(C): ACTION = INSTALL
Property(S): ACTION = INSTALL
Property(S): ADDLOCAL = FeatureName
Property(S): AdminToolsFolder = C:\Documents and Settings\All Users\Start Menu\
                 Programs\Administrative Tools\
Property(C): AdminToolsFolder = C:\Documents and Settings\username\Start Menu\
                 Programs\Administrative Tools\
Property(S): AdminUser = 1
Property(C): AdminUser = 1
…and so on.
Similarly, to display just information about action starts, stops, and return values, use /Li. The log starts something like this:
=== Logging started: 0/0/0000  00:00:00 ===
Action start 00:00:00: INSTALL.
Action start 00:00:00: AppSearch.
Action ended 00:00:00: AppSearch. Return value 0.
Action start 00:00:00: LaunchConditions.
Action ended 00:00:00: LaunchConditions. Return value 0.
Action start 00:00:00: FindRelatedProducts.
Action ended 00:00:00: FindRelatedProducts. Return value 0.
Action start 00:00:00: ValidateProductID.
Action ended 00:00:00: ValidateProductID. Return value 1.
Action start 00:00:00: CostInitialize.
Action ended 00:00:00: CostInitialize. Return value 1.
... etc. ...
The MSI help topic “Logging of Action Return Values” describes what these return values mean.
I have no idea what the c and u switches do.
As you know, you can expand the values of your MSI package’s properties—for example, in registry or INI data—at run time using [PropName] expressions. Something that’s a bit trickier is to use the values of properties that you’ve defined in a merge module.
The idea is that every merge module has a unique identifier, which is stored in the ModuleSignature table. (You can stop reading if you create merge modules by hand; this is useful only if your development environment hides these details.) An identifier looks like ModuleName.HHHHHHHH_HHHH_HHHH_HHHH_HHHHHHHHHHHH, where the HHHH_etc. number is a GUID with the curly brackets removed and the hyphens replaced with underscores. Many primary keys in your merge module database (your MSM file) are decorated with that .HHHH_etc. suffix, which means that component names, Registry-table keys, and (the reason we’re talking about this) Property-table and Directory-table keys have that quasi-GUID appended.
For example, suppose you have a property called MERGE_MODULE_PROPERTY defined in your merge module project. If you merge your merge module into a full MSI package and create a log file while deploying the MSI package, mixed in with the main MSI’s properties you’ll see entries that look like this:
Property(C): WindowsFolder = C:\WINDOWS\
Property(C): WindowsVolume = C:\
Property(C): MERGE_MODULE_PROPERTY.EEEEEEEE_EEEE_EEEE_EEEE_EEEEEEEEEEEE = msm property value
Property(C): VersionNT = 601
Therefore, if you want to expand the value of your merge module property at run time, you’ll need to use the [PROP.HHHHHHHH_HHHH_HHHH_HHHH_HHHHHHHHHHHH] format.
Moreover, if you see other log entries with that kind of suffix, the attached item probably comes from a merge module.
Note that the decorations go only one way: if your merge module uses undecorated [PROPNAME] somewhere, the property (if there is one) from the consuming MSI package will be expanded normally.
The AppSearch action is typically used to search for a file on the target system, and populates the value of a public property with the full path to the file if it exists. (AppSearch can also be used to read data from the registry or an INI file in [WindowsFolder], but it’s not really “searching”.) A record in the AppSearch table contains the name of the public property to be populated with the results, and the primary key of a record in the Signature table; which in turn contains the file name, along with an optional range of acceptable versions, range of sizes, range of dates, and a language for the file. In addition, the DrLocator table—not sure why it’s not the “DirLocator” table—specifies the directory and number of levels of its subdirectories in which to search.
The AppSearch table is processed by the AppSearch action, which occurs early in the UI sequence. (Also early in the Execute sequence, in case of a silent or other non–full UI installation, but never mind that for now.)
Naturally, AppSearch can take a while to execute, so it’s a courtesy to display information about what’s taking so long. To handle this, schedule a modeless dialog in the User Interface sequence before AppSearch (in the UI sample from the Platform SDK, the corresponding dialog box is called “PrepareDlg”). On this dialog box, you can place Text controls that subscribe to the ActionText and ActionData control events. Finally, in the ActionText table, specify appropriate values for the AppSearch action.
In the following figure, the AppSearch record in the ActionText table has the text beginning “ActionText says:” in the Description field, and the text beginning “ActionData says:” in the Template field.
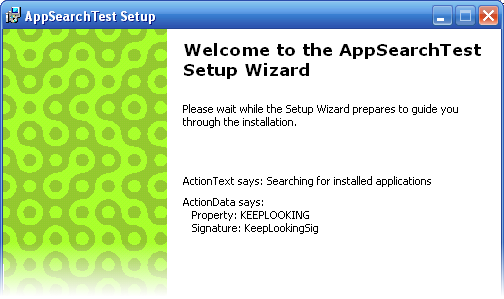
The ActionData/Template value doesn’t add much to it—just displaying the property and signature names—so nobody would blame you for leaving it out.
To launch a batch file from a custom action, you can’t just specify the .bat file as the executable to run; instead, you can launch cmd.exe or command.com, depending on the platform, with the path to the batch file as an argument. Instead of hard-coding the path to the command processor—which plenty of people seem to think is just fine—you can expand the COMSPEC environment variable and launch the result.
There’s probably a better way, but a two-step process for launching a batch file that you’re installing is:
Pop quiz: why can’t we just get rid of the first action and use [%COMSPEC] in the source of the second action?
As usual, to run the actions only during the initial installation, give the actions the condition Not Installed, or, better yet, use the $ComponentName=3 type of condition.
(At this point, I might as well admit that I don’t know an automatic way to hide the command prompt window.)
Keep in mind that you don’t need to launch a batch file to launch something that’s already in the form of an executable. For example, I’ve seen installers that launch a batch file just to run net.exe or attrib.exe. I’ve seen things you wouldn’t believe.
First in a series of notes about things that seem to be impossible (or very difficult, or really bad ideas) to do with MSI.
(Short version.)
They’re not at all difficult to find, but some often overlooked MSI API functions to enumerate what’s installed on a system:
Product and component information:
Product, feature, component states (installed? advertised? etc.):
Unsorted notes related to VBScript and JScript custom actions (assuming the world can’t talk you out of it):
' VBScript:
Session.Property("USERNAME") = "Valued Customer" ' value must be a string
MsgBox "Hello, " & Session.Property("USERNAME")Session.TargetPath("CaseSensitivePropertyName")For MSI newcomers, a common hurdle appears to be figuring out that property names are case-sensitive, followed by figuring out what capitalization to use. Most common mistakes:
If you choose the wrong capitalization, MSI thinks you’re making up a new property with an empty value, meaning conditions that use the erroneous names probably won’t evaluate the way you want them to. ICE46 will help.
And the most common resolutions to “How come my property value disappeared/went back to its default value?”–type problems:
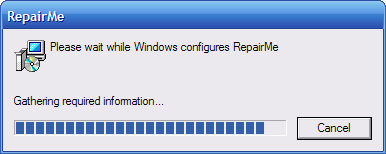
Another common question is, “Why does Windows Installer run every time I restart my system/start my application?”
This behavior is part of the resiliency or self-repair feature of Windows Installer. (This question has been answered many times in many places, but not with pictures.) When MSI fails to find a resource it needs, it displays a configuration dialog box similar to the following:
To see details about the missing resource, open the Event Viewer (Control Panel > Administrative Tools); the details are in the Application section.
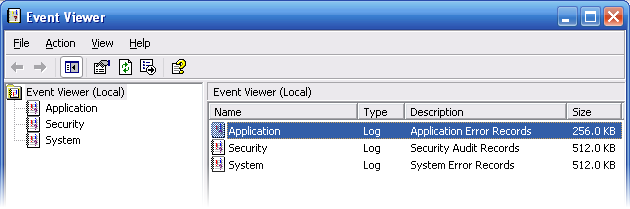
The details of the repair are the MsiInstaller entries in the Application section of the event viewer.
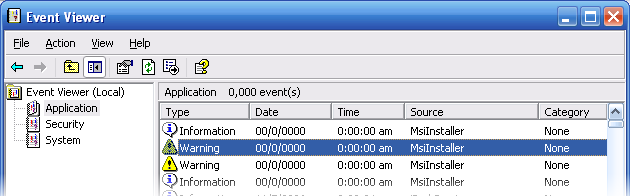
Double-clicking the warning event reveals the event properties; the details of the event list the product code, feature name, and component code involved, as well as the missing resource.
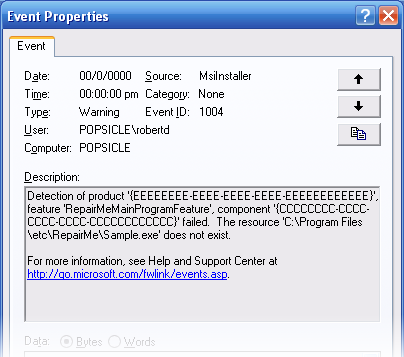
(A previous tip hinted at how to get more information about a product or component, given its GUID.)
I’m not aware of a way to disable self-repair, short of disabling advertised shortcuts, extracted COM information, Extension-table file associations, etc.
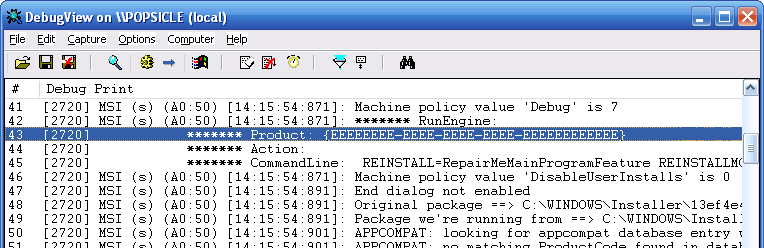
A follow-up question is how to log self-repair operations, since there’s not an explicit msiexec command to which you can add the /L switch. One uninviting method is to set the system-wide Logging policy, which creates a debug log in the Temp folder for each MSI operation. A somewhat less uninviting option is to set the system-wide Debug policy (to 7), and then use DebugView from Sysinternals to view the “live” debug log.
Don’t.
A common request for installation programs is to display a small modal dialog box while a lengthy action is taking place (similar to SdShowMsg, for those familiar with InstallScript programming). The nearest built-in equivalent in MSI is a dialog box triggered with the SpawnWaitDialog control event, which displays a modal dialog box until a specified condition is true.
For example, suppose you have a button reading “Perform lengthy action…” on one of your dialog boxes, and you want a dialog box similar to the following to be displayed while the action is taking place:
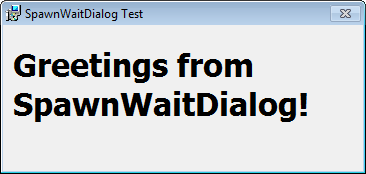
You can create this dialog using the Dialog and Control tables, the main point being to make sure the dialog (called SpawnMe in the Dialog table) has the modal attribute (value 2) set.
For this example, I’ve defined the lengthy action to be an asynchronous DLL action, with the following implementation.
#pragma comment(lib, "msi.lib")

#include <windows.h>
#include <msi.h>
#include <msiquery.h>

UINT __stdcall LengthyAction(MSIHANDLE hInstall)
{
    Sleep(5000); // <-- put long-running code here

    // set property that indicates the action is finished
    MsiSetProperty(hInstall, TEXT("DoneWithLengthyAction"), TEXT("X"));
    return ERROR_SUCCESS;
}
Naturally, the code that takes a long time will take the place of the Sleep function above. (Someone once asked me for a way to slow down an installation program, which is about the fifth-funniest installation-related question I’ve been asked.) As with all custom action DLLs, you’ll probably want to use a .def file or the like to suppress name decoration:
LIBRARY WaitThenSetProperty

EXPORTS
    LengthyAction
A good place for this kind of helper DLL is in the Binary table. The action that calls the LengthyAction function from WaitThenSetProperty.dll has type 193, asynchronous DLL. Predictably, in the CustomAction table I’ve named the action CallLengthyAction.
To tie everything together, your “Perform lengthy action…” button will have two control events: one to launch the action, one to spawn the wait dialog box while the action is running. The first one should be familiar: a DoAction control event with target CallLengthyAction and condition 1.
The second control event is a SpawnWaitDialog control event, with argument SpawnMe (the name of the dialog to spawn) and condition DoneWithLengthyAction (a condition indicating when the dialog is no longer needed, using the property defined in the DLL action code).
When running the project, the initial dialog box might look as follows:
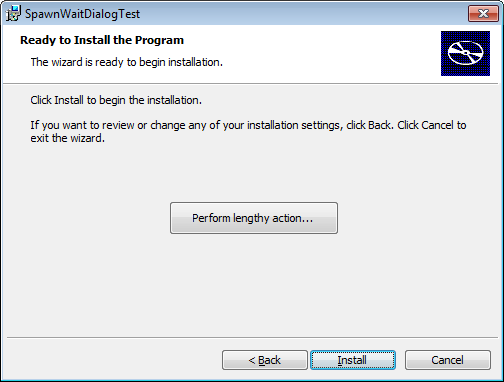
When the user clicks the big button, and while the action is running (that is, while DoneWithLengthyAction is unset), the spawned dialog box appears over the normal dialog box as follows:
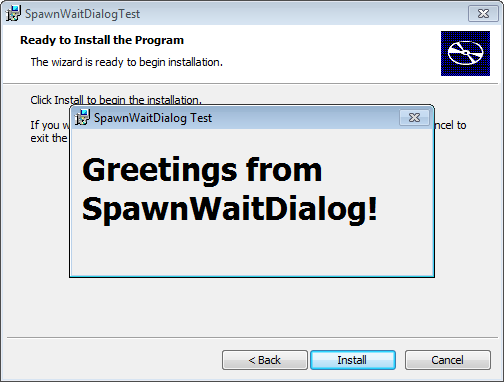
Once the action has finished (that is, once the condition DoneWithLengthyAction is true; that is, once the action sets the DoneWithLengthyAction property to any value), the spawned dialog vanishes, and the dialog box appears as it did in the first figure.
Closing remarks:
Though it could be argued MSI is obfuscated enough.
A handful of gizmos that are good to have around when you’re learning your way:
© 2006–2026 Robert Dickau. All rights reserved, no responsibilities accepted.
[ home ] || [ 2012-10-27 ]
www.robertdickau.com/msi_tips.html